BEIJING TIME VISION AI INSTRUMENT LTD.-Automated inspection expert
https://onlinemachinemfr.com/
wechat:0086 152 0162 5204
Email: hardnesstester01@gmail.com
———————————-
Digital display compression testing machine,hardness testers rockwell,olympus omniscan mx2 ultrasonic phased array flaw detector,which two tests would you perform on a hydraulic system,leeb hardness tester user manual,tensile test machine equipment,kency coating thickness gauge,Bending tension validation tester,Corrosion Thickness Gage affordable supplier,hardness measuring tutorials.
A hardness tester is a valuable tool used in various industries to measure the hardness of materials. To use a hardness tester effectively, follow these steps:
1. Prepare the surface: Before testing, ensure that the surface of the material is clean and free of any debris or contaminants that could affect the accuracy of the results. Digital Micro Vickers Hardness Tester TH710/711 https://onlinemachinemfr.com/product/digital-micro-vickers-hardness-tester-th710-711/
2. Select the appropriate test method: There are different types of hardness tests, such as Rockwell, Brinell, and Vickers. Choose the method that is most suitable for the material being tested.
3. Calibrate the tester: Before performing any tests, it is important to calibrate the hardness tester to ensure accurate results. Follow the manufacturer’s instructions for calibration.
4. Position the tester: Place the hardness tester on the surface of the material to be tested, making sure it is securely positioned and in contact with the surface.
5. Apply the test load: Depending on the test method, apply the appropriate test load to the material. This may involve pressing a penetrator into the material or using a machine to apply pressure.
6. Record the results: Once the test is complete, record the hardness value indicated on the tester. This value will help determine the hardness of the material.
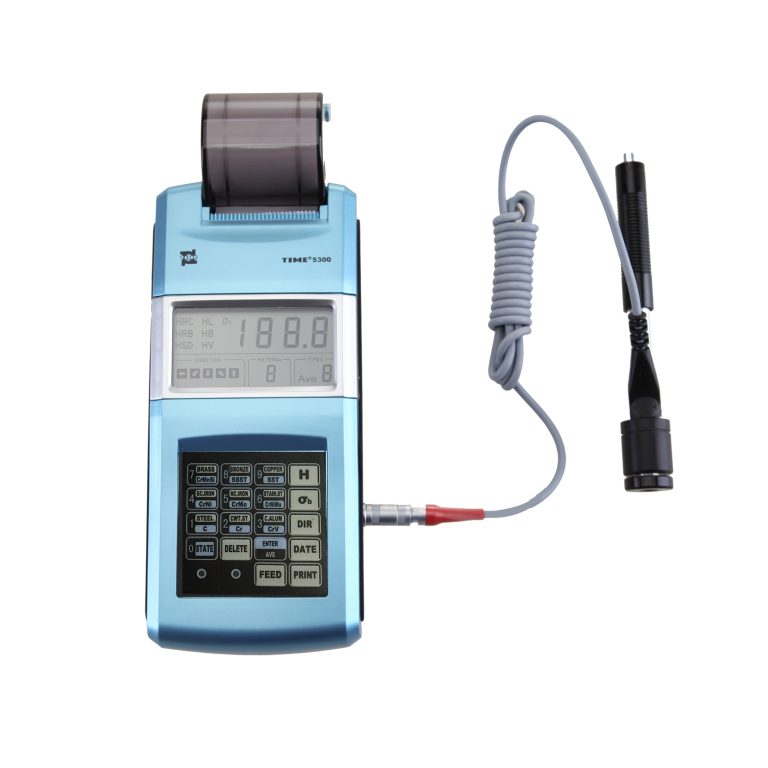
7. Interpret the results: Depending on the test method used, the hardness value may be indicated on a scale or in a numerical format. Compare the results to known hardness values for the material to determine its hardness. Rockwell Hardness Tester TIME6166/6167/6168 https://onlinemachinemfr.com/product/time-hardness-tester-time6166-6167-6168/
Using a hardness tester requires careful preparation, proper calibration, and accurate interpretation of results. By following these steps, you can effectively measure the hardness of materials in various industries. Servo Hydraulic Universal Testing Machine WAW-600L https://onlinemachinemfr.com/product/servo-hydraulic-universal-testing-machine-waw-600l/
Mounting press machines are essential tools in the field of printmaking and are used to create high-quality prints by applying pressure to the printing plate and paper. If you are new to using a mounting press machine, here are some steps to help you get started:
1. Prepare your materials: Before using the mounting press machine, make sure you have all the necessary materials on hand, including your printing plate, paper, and any additional tools or supplies you may need.
2. Set the temperature: Most mounting press machines have adjustable temperature settings. Consult the manufacturer’s instructions to determine the appropriate temperature for your specific materials.
3. Prepare the printing plate and paper: Place your printing plate on the bottom platen of the mounting press machine, followed by your paper on top of the printing plate. Make sure the paper is aligned correctly with the printing plate to ensure a clean transfer.
4. Adjust the pressure: Use the pressure adjustment knob on the mounting press machine to set the desired pressure for your print. Start with a lower pressure setting and gradually increase it as needed.
5. Run the machine: Once you have set the temperature and pressure, carefully close the top platen of the mounting press machine. Allow the machine to run for the specified amount of time, typically around 1-2 minutes, to transfer the image from the printing plate to the paper.
6. Remove the print: After the machine has finished running, carefully open the top platen and remove the paper from the printing plate. Your print should now be transferred successfully.
7. Allow the print to dry: Depending on the type of ink and paper you used, your print may need some time to dry before handling. Place the print on a flat surface and allow it to dry completely before framing or displaying.
By following these steps, you can effectively use a mounting press machine to create high-quality prints for your printmaking projects. Remember to always follow the manufacturer’s instructions and take proper safety precautions when using the machine. With practice and patience, you can master the art of using a mounting press machine and create beautiful prints for your collection.